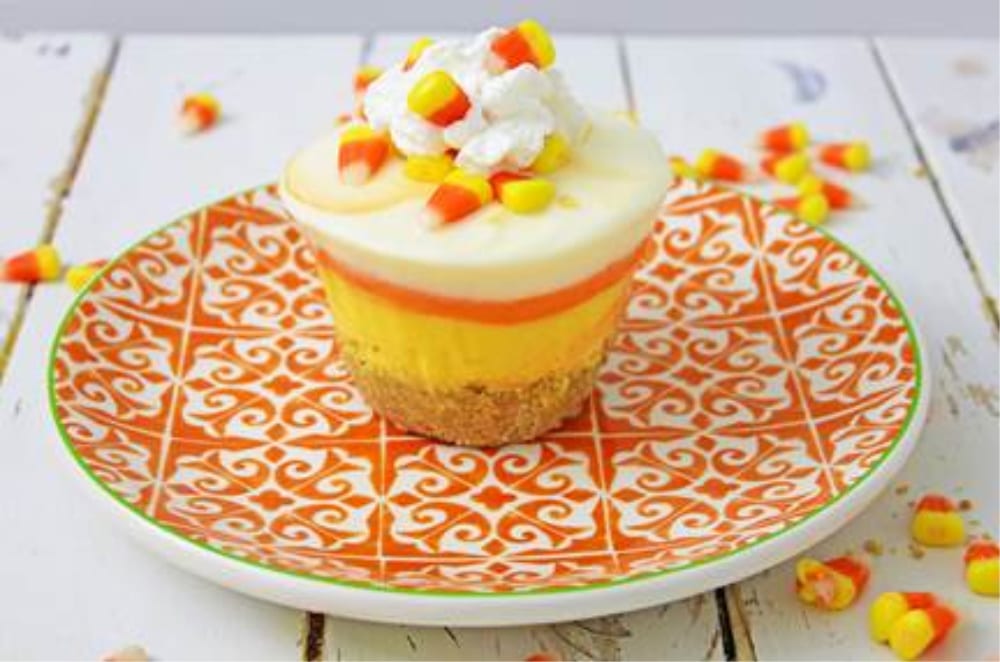
Miniature Candy Corn Cheesecakes

Candy corn is just one of those iconic seasonal candies that makes you feel like a kid again! Today we’re taking all the things we love about this festive, sweet fall candy and putting it together with another crowd-pleasing treat: cheesecake. This show-stopping Candy Corn Cheesecake is totally delicious and sure to impress any guests you entertain this autumn. Instead of being baked, this cheese-cake is frozen, giving it a cool textural component that matches its candy corn decoration! (Bonus: no bake = really difficult to mess up.)
Note: While Candy Corn Cheesecake require no baking, they do require several hours of freezer-time. Because of this, you will have the best results if you put them together the day before you plan to serve them.
For the Crust:
Before you get started, line the bottoms of a deep muffin pan with parchment paper.
Tip: leave some some strips of parchment paper sticking out over the sides of muffin cup. This will help you remove your cheesecakes, later.
To create this simple graham cracker crust, you only need graham cracker crumbs, sugar and butter. Stir together the sugar and pre-ground graham cracker crumbs (you can buy them pre-ground or pulverize some graham crackers in your food processor, beforehand). Once the crumbs and sugar are well-combined, add in the melted butter. Stir well, making sure it is evening distributed. Measure 2 tablespoons of crumbs into each muffin tin and press it into the bottom of the muffin tin, using your fingers.
Place the tin in the freezer to let the crust set while you make your filling!
For the Filling:
The Base
Make sure your cream cheese has been sitting out long enough to get soft. Place the softened cream cheese into the mixing bowl of a stand mixer (or into a regular mixing bowl if you plan to use a hand mixer). Use a whisk attachment to beat the cream cheese and loosen it up.
Scrape down the sides of the mixing bowl and add in the heavy cream. Blend until smooth and creamy. Again, stop mixing and scrape the mixture on the sides of the bowl back down into the mix.
At this point you will add your vanilla and granulated sugar. Then blend some more!
Now it’s time to add the powdered sugar. To keep the mixture from clumping, add in the powdered sugar a little bit at a time, while continuing to mix. Scrape down the sides of the bowl one last time after adding all of the powdered sugar.
The 3 Layers
At this point, you will divide your sweet, cream cheese mixture into three, equal parts. Grab two extra bowls and place 1/3 of the mixture into each of them, leaving 1/3 of the mixture in the mixing bowl.
As you may have guessed, each portion of the cream cheese mixture is going to be a different “candy corn” color: white, yellow and orange!
Put one of the bowls with the cream cheese mixture in the fridge (this will be designated as the white layer).
In the other bowl, add the yellow food coloring gel until the desired color is achieved. (I simply used a candy corn as a reference for the colors).
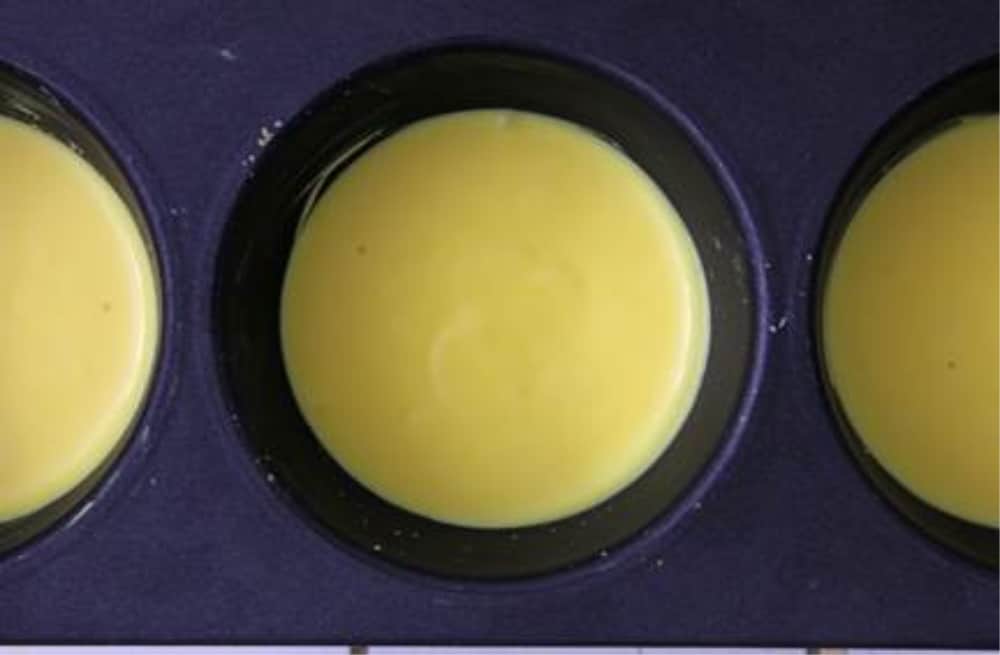
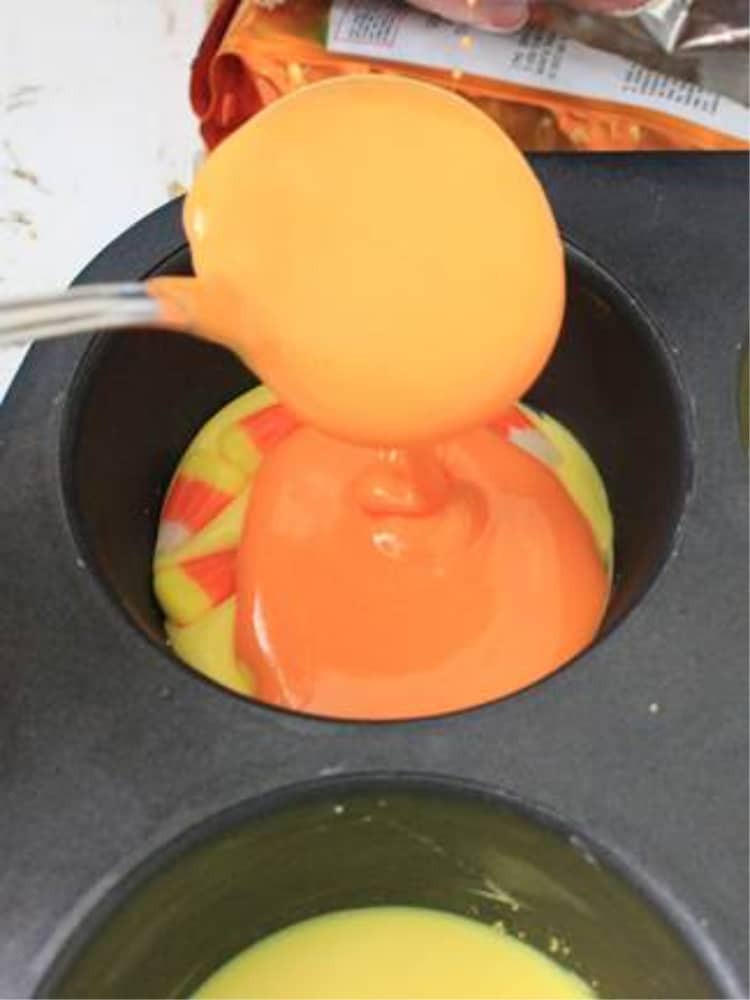
Remove the muffin tin from the freezer and add the yellow cream cheese mixture evenly to the muffin tins. Optionally, press a few candy corns into the yellow layer! Place the muffin tin back into the freezer.
Next, add the orange food coloring to the mixing bowl and mix it until it reaches “candy corn orange.” Once it’s fully combined and the right color, place this bowl of cream cheese in the refrigerator.
After it’s been in the freezer for about an hour, pull out the muffin tin and check to see if the yellow cheesecake mixture is firm to the touch. If so, add the orange cheesecake mixture to the tin. (If it’s not set, leave the tin in the freezer for a bit longer.)
After you add the orange cheesecake, place the tin back into the freezer. Check to see if the orange cheesecake has set in about an hour. If it has, add the white cheesecake mixture onto the very top.
Now you just have to have a little patience! Place the tin back in the freezer, and leave it for at least 6 hours, or overnight for best results. Freezing this dessert between each layer, and then as a whole, gives it an awesome finished look.
For Serving:
Use a thin frosting spatula and slide it between the strip of parchment paper and the muffin tin to loosen each cheesecake.

I find it works best to get them out easily placing a cookie sheet on top of the muffin tin. Then I turn the cookie sheet with the muffin tin upside down. The cheesecakes should come out of the tin and onto the cookie sheet. Remove the cheesecakes with a pie server to a serving plate. Top with fresh whipped cream, and additional candy corns (as many as you like!)

We hope you enjoy this festive treat at your next autumn gathering! (Don’t forget to brush your teeth after eating them).
Let us know how it turns out for you!

Miniature Candy Corn Cheesecakes
Description
Love candy corn? How about cheesecake? This delicious, no-bake fall dessert is a match made in heaven. Plus, it’s absolutely show-stopping in terms of presentation. This is the perfect special treat to serve to dinner guests, friends, or family.
Ingredients
FOR THE CRUST:
2 cups of graham cracker crumbs (We used Keebler – found on the baking isle)
1/2 cup of butter – melted
2 Tablespoons of sugar
FOR THE FILLING:
4 – 8 ounce packages of cream cheese – Softened
1/2 cup of heavy cream
2 cups of powdered sugar
2 Tablespoons of granulated sugar
2 Tablespoons of vanilla
Yellow food coloring gel
Orange food coloring gel
Candy corn – for topping and garnish
COOKS TOOLS NEEDED:
6 count – 3 inch deep muffin tin (or 3 inch cake molds)
Electric mixer
Parchment paper
Spatulas
Bowls
Instructions
Line the bottom of a deep muffin tin with parchment paper, leaving strips on each side going up the tin.
Combine the graham cracker crumbs and sugar, and blend well.
Add the melted butter, and stir well to coat the crumbs.
Press 2 Tablespoons of crumbs into the bottom of the deep muffin tin, on top of the parchment paper.
Place the tin in the freezer.
In the mixing bowl of a stand mixer, place the softened cream cheese, and mix with the whisk attachment until the cream cheese is smooth.
Scrape down the sides of the mixing bowl, and blend again.
Add the heavy cream and blend until smooth and creamy.
Stop the mixer, scrape the sides of the mixing bowl again and blend.
Add the sugar and vanilla. Blend some more!
Add the powdered sugar a little at a time, blending and scraping the sides of the bowl between additions, until all the powdered sugar has been added.
Divide the cream cheese mixture into thirds.
Get two bowls, and place 1/3 of the cream cheese mixture into each one.
Leave 1/3 of the cream cheese mixture into the mixing bowl. Set 1 of the bowls of the original (white, or plain) mixture in the refrigerator.
In the other bowl, add the yellow food coloring gel until the desired color is achieved. (I used a candy corn as a guide for the colors).
Remove the muffin tin from the freezer, and add the yellow colored cream cheese mixture evenly to the muffin tins. Place the muffin tin back in the freezer.
Add the orange food coloring gel to the mixing bowl until the desired color, or color of orange that matches the candy corn is achieved.
Mix the cream cheese mixture, and place the mixing bowl with the orange colored cream cheese in the refrigerator.
After about an hour in the freezer, check the tin to see if the cheesecake mixture is set.
If it has set, add the orange cheesecake mixture to the tin.
(If it’s not set, leave the tin in the freezer for another hour, or until it is hard.)
Return the tin in the freezer after the orange cheesecake is added.
When it is frozen, add the white cheesecake mixture on top of the orange layer.
Place the tin back in the freezer, and leave it for at least 6 hours, or overnight for best results.
For serving: use a thin metal icing/frosting spatula, and slide it between the strip of parchment paper and the muffin tin to loosen the cheesecakes.
Repeat this until all the cheesecakes are loosened.
Place a cookie sheet on top of the muffin tin, and then turn the cookie sheet with the muffin tin upside down, to invert or remove the cheesecakes from the tin.
The cheesecakes should come out of the tin and onto the cookie sheet.
Remove the cheesecakes with a pie server to a serving plate.
Top with fresh whipped cream, and additional candy corns.
Enjoy!