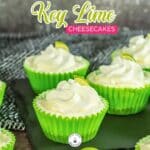
No-Bake Key Lime Cheesecakes

Looking for a delicious and educational way to bring a little kitchen chemistry into your homeschool day? These No-Bake Key Lime Cheesecakes are the perfect hands-on activity for your little learners! Not only are they simple to make, but they also offer a great opportunity to teach basic kitchen skills, introduce scientific concepts like chemical reactions (hello, citrus and dairy!), and enjoy a sweet reward at the end. They’re also a terrific St. Patrick’s Day treat!

Why This Recipe Works for Homeschooling
Cooking with kids isn’t just about making tasty treats—it’s about learning! Here’s why this recipe is a great fit for your homeschool routine:
- Math Skills – Measuring ingredients helps reinforce fractions and counting.
- Science in Action – Mixing lime juice with dairy? That’s an acid-base reaction thickening your filling!
- Life Skills – Cooking teaches patience, following directions, and responsibility.
- Hands-On Fun – No-bake recipes mean kids can participate safely without worrying about hot ovens.
Mini Key Lime Cheesecakes Recipe
Difficulty: Easy
Prep Time: 15 minutes
Chill Time: 4 hours
Servings: 15 cupcake-sized cheesecakes
Ingredients

For the crust:
- 1 ½ cups graham cracker crumbs
- 6 tablespoons unsalted butter, melted
For the filling:
- 2 (8-ounce) packages cream cheese, softened
- 3 tablespoons heavy cream
- ¼ cup sugar
- 1 tablespoon lime zest
- ¼ cup lime juice
For the topping:
- ½ cup heavy cream
- Additional lime slices, for decoration
Step-by-Step Instructions
Prepare the Pan: Line a standard cupcake pan with paper liners and set aside. For these to have a bright color that matches this dessert (and also make a terrific St. Patrick’s Day treat), use green cupcake liners.
Make the Crust: In a medium bowl, mix the graham cracker crumbs and melted butter until the mixture resembles wet sand.


Assemble the Crust: Spoon a heaping tablespoon of the crust mixture into each cupcake liner and press it down firmly. Set aside.

Mix the Filling: Using a stand mixer or hand mixer, beat the softened cream cheese, heavy cream, and sugar until smooth and fluffy.
Add the Key Lime Flavor: Mix in the lime zest and lime juice, scraping the sides of the bowl to ensure everything is well incorporated.


Fill the Cups: Spoon or pipe the filling evenly into each cupcake liner, smoothing the tops.

Chill to Set: Refrigerate the key lime cheesecake minis for about 4 hours (or overnight for best results).
Whip the Topping: Right before serving, whip the heavy cream in a mixer until stiff peaks form.


Decorate: Pipe a small dollop of whipped cream onto each key lime cheesecake and top with a lime slice.


Storage Tips
Store these mini key lime cheesecakes in the fridge for up to two days. If you’re making them ahead for a homeschool co-op St. Patrick’s Day event or family gathering, they also freeze well! Just thaw them in the fridge before serving.

Homeschool Extensions & Learning Ideas
Want to turn this key lime cheesecake recipe into an even bigger learning experience? Here are a few ways to expand the lesson:
- Math Practice: Have kids measure ingredients, double the recipe, or convert tablespoons to teaspoons.
- Science Experiment: Discuss why the lime juice thickens the cream cheese (hint: acid reacts with dairy proteins!).
- History & Geography: Research the history of Key limes and where they grow.
- Writing Exercise: Ask your kids to write step-by-step instructions in their own words or create a pretend cooking show script.
No-Bake Key Lime Cheesecakes
Ingredients
For the crust
- 1 ½ c graham cracker crumbs
- 6 T unsalted butter, melted
For the filling
- 2 – 8 oz packages cream cheese, softened
- 3 T heavy cream
- ¼ c sugar
- 1 T lime zest
- ¼ c lime juice
For the topping
- ½ c heavy cream
- Additional lime slices, to decorate
Instructions
- Line a standard cupcake pan, set aside.
- In a medium bowl, combine the graham cracker crumbs and melted butter. Mix until it looks like wet sand.
- Measure out a heaping tablespoon of crust into each cupcake liner. Press into the bottom of the pan. Set aside.
- In the bowl of a stand mixer, combine the softened cream cheese, heavy cream and sugar. Whip until mixed and thoroughly combined.
- Add in the lime juice and zest. Mix to combine, scraping the sides often.
- Scoop out the filling and fill each cupcake liner until the top of the pan, spreading evenly.
- Chill for approximately four hours.
- When ready to assemble – in the bowl of a stand mixer, whip the heavy cream to stiff peaks.
- Transfer the cream to a piping bag fitted with a large star tip.
- Pipe a small dollop onto each cheesecake.
- Top with a lime slice to decorate.
Notes
Storage: Cheesecakes should be stored in the fridge for up to 2 days.